Lightroom

Adobe Lightroom 5 beta Advanced Healing Brush

A close-up look at Adobe Lightroom 5 beta's new Advanced Healing Brush. Although you can see a video from Adobe showing off Adobe Lightroom 5 betas's Advanced Healing Brush, I wanted to show some examples at 100% so we can really take a close look at this new tool. Often times I find a video will really show a new software feature but when you scrutinize it at 100% the results can be disappointing. First off, here's Adobe's video showing the new tool.

Now let's look at a real world example. One thing I often have to retouch is logos off of shoes. Take for example the NBA logo on these high tops. I'll first look at the side logo then the one on the tongue. The full image is first so you can see how close I'm working.

Black family photo
Screen Shot 2013-04-17 at 1.34.14 PM

First I painted the area to be retouched and the results are below.

Adobe Photoshop Lightroom 5 beta Advanced Healing tool sample

The sampled selection does not match so I looked around the image for a better match. The other areas on the high-top didn't quite fit so I sampled from another shoe. Even though, the other shoe was a different color, and different texture, it was a better match because both areas were relatively smooth. The match is not perfect, and it's up to you if it done well enough. There is a mis-match of texture most noticeable on the right. Remember this is at 100% so when zoomed out, the texture will be less noticeable. This example illustrates that you can ignore color when looking for a sample area.

Lightroom 5 advanced healing brush example
Adobe Lightroom Advanced Healing Brush results

Now for a the logo on the tongue, a similar problem. Adobe Lightroom 5 beta again sampled from a nearby area that wasn't a good match, so I moved the sample to the top of the toe area. The sampled area has a crease which transferred to the new area.

Advanced Healing Brush in Adobe Lightroom 5 beta
Selection Change in spot Healing Tool of Lightroom
Advanced Healing Brush Results
Conclusions

It's a major advantage to be able to paint in a selection rather than be confined to a perfect circle. My first two efforts offered mix results but I'm still optimistic about their promise. For best results you will need a good area to sample, but that has always been the case. Adobe should be applauded for their efforts to improve the retouching tools in Lightroom even if they overlap with the features of their flagship program Photoshop.

Adobe Lightroom 4 vs Lightroom 5 Beta Benchmark Speed Test

Update: Now that the official version of Lightroom 5 is out, I've rerun the speed test and I can confidently state that exports and previews build at identical speeds in Lightroom 4 and Lightroom 5. Original Post Below

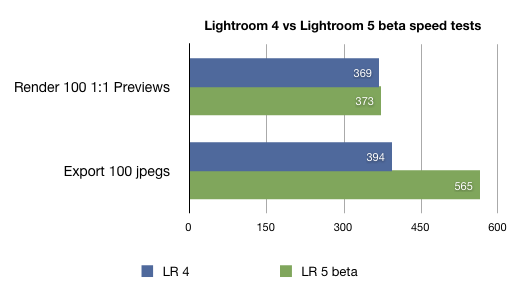
I've taken the opportunity to run some benchmarking test to find out if Lightroom 5 beta is faster or slower than Lightroom 4, specifically rendering 1:1 previews and jpeg exports. For my speed tests, my computer is a 2012 (unibody, non-retina) Macbook Pro 15″ quad-core 2.3ghz i7, 16GB RAM, and 5400rpm hard drive. My raw image files are from a Canon 5D Mark III. Time displayed in seconds, shorter is better.

Lightroom 4 vs Lightroom 5 beta speed tests


Rendering Previews were comparable but the exports were tremendously slower. I did not apply any adjustments to my files so I can't blame the new tools. I double checked my results. We can only hope that the final release of Lightroom 5 will be much faster when exporting images.

Another interesting feature of Adobe Lightroom 5 is the new Smart Previews. Smart Previews allow you to build 2540 pixel length previews that will work offline so you don't need to store all your files locally or carry around an external drive. You will need to build the Smart Previews before you take your original files offline. In my testing, Smart Previews build in a little over half the time as 1:1 previews, but remember at 2540 pixels on the long end, they would be half as long and a quarter of the area of the full 1:1 previews. The Canon 5d Mark III files are 5760 pixels on the long end.

From DPReview

How much space do you save? We're still running comparisons, but in a Lightroom 5 public beta test catalog containing 1100 raw files, the standard Previews.lrdata file (which contained 1:1 previews) took up 3.65GB of storage. We exported this same catalog of images using only Smart Previews and the resulting Smart Preview.lrdata file weighed in at a meager 420MB. The size of each Lightroom catalog (.lrcat) itself was essentially identical.

So Smart Previews would allow you to have about 8.5 times as many images locally versus raw images.

DP Review's Raw Converter Showdown

DP Review compares Lightroom 4, Capture One Pro 7, and DxO Optics Pro 8. I'm surprised by inclusion of DxO Optics Pro and saddened at the exclusion of Apple's Aperture. The article compares many aspects of the raw converters but ultimately concludes it's up to the user to decide what is most important. I've never used DxO Optics Pro and don't know anyone who does. Capture One Pro I've always found difficult to use, although it's speed is impressive. For now, I'm sticking with Adobe Lightroom because of it's cataloguing, key wording, workflow, retouching, and plug-in architecture.

Adobe Lightroom 4 Performance Comparison with 4GB and 16GB of RAM

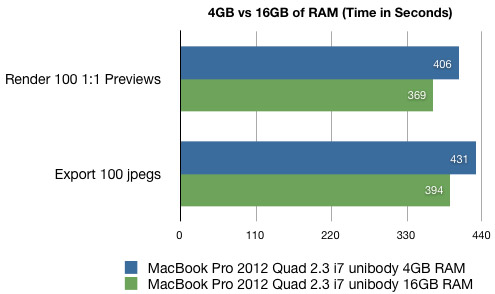
Adobe Lightroom 4 can be a real resource hog and so it’s worth taking a look at your hardware to see how you can improve performance. I’ll be testing 1:1 preview rendering and jpeg exports on a mid 2012 MacBook Pro quad 2.3ghz unibody machine. First the machine was tested with the stock 4GB of RAM and then later with 16GB installed. Here are the results. chart 4gb vs 16 gb ram lightroom 4

Lightroom is showing about a 10% increase in speed performance comparing 4GB to 16GB of RAM. Perhaps not a very significant performance gain in preview renders and jpeg exports. However, as I detailed before, increased RAM does allow you to run more programs along side Lightroom 4, such as Adobe Photoshop, and it does allow you to work for much longer before needing to restart. The increased RAM will also store your recently accessed Lightroom previews so those will load quickly.

This test machine had a traditional 5400rpm spinning hard drive which I opted for the increased capacity. If your wondering about an SSD drive, you may want to read this detailed post which determines that SSD drives have a marginal impact when rendering previews with Lightroom. Although an SSD drive will help with scrolling through thumbnails in the grid mode.

In short, more RAM will improve the overall usability of Lightroom 4 but performance benchmarks are not the best measure of those gains.

How Much RAM Does Lightroom 4 Use?

I’ll cut straight to the chase, Adobe Lightroom 4 will use all available memory in a MacBook Pro, although how much you need depends on your workflow. Now for the long answer. Using Activity Monitor on Mac OSX and running Lightroom 4, I monitored how much RAM was free or used. You can read about Activity Monitor on Apple’s website, but I’ll give a quick synopsis. The pie chart represents the computers total RAM, red and yellow is used and unavailable, respectively. Green is free and available. Blue is recently used but available. In brief, red and yellow is bad, but green and blue are good.

THE SIGNIFICANCE OF PAGE OUTS

One thing I learned from observing Activity Monitor is how much page outs reflected my Mac’s performance. Page outs happen when RAM is not available, and so the operating system chooses to write information to the hard drive. There was often page outs whenever my Mac would get sluggish or show the dreaded spinning beach ball of death. In my case, I also observed that page outs would occur even if there was inactive (blue) RAM which should be free to use. Page out were minimized only when there was plenty of free (green) RAM. More on this later.

ADOBE LIGHTROOM 4 WITH 4GB OF RAM

Let’s look at Lightroom 4 with 4GB of RAM installed on a 2012 MacBook Pro core i7 2.3ghz. After a half hour of running Lightroom 4 and iTunes, 1GB of RAM was available, plus there was already 179 MB of page outs. Over the course of a day and a half, I ran Lightroom 4 along side Photoshop, Safari, Mail, and iTunes. Out of 4GB of RAM installed, just 500MB were free, but the real sign of insufficient RAM is the whopping 4.77 GB of page outs.

activity monitor 4gb ram

Lightroom 4 did run okay during this time. Yes it did occasionally get sluggish but I never felt compelled to shut down and restart. Contrast this with my 2009 Core 2 Duo MacBook Pro which had 8GB of RAM but was nearly unusable with Lightroom 4. This is where RAM only tells half the story. Apparently, you can get by with less RAM if your processors are speedy.

ADOBE LIGHTROOM 4 WITH 16GB OF RAM

Now let’s look at the same 2012 MacBook Pro core i7 2.3 ghz with 16GB of RAM. After a full day of using Lightroom 4 along with several other programs, the Mac still had 4GB of free memory and only had 48 KB of page outs. After 5 days, the Mac was down to just 100 MB of free memory and wrote 2.3 MB of page outs. Lightroom 4 ran very well during this time. In the Lightroom develop module, I applied brushes and gradients in an attempt invoke slow downs but performance was quite snappy.

activity monitor 16gb ram

HOW TO QUICKLY USE 16GB OF RAM WITH LIGHTROOM 4

When running Lightroom 4, viewing many full screen previews will consume nearly all available memory. I was able to quickly use 13GB of RAM scanning through 500 full screen previews in 30 minutes. It seems that Lightroom will store recently viewed previews in RAM. This is a good scenario, since Lightroom can quickly grab those previews out of memory should they be needed again.

Activity monitor 16gb ram at start up

Mac activity monitor 16gb ram

So, on one hand, 16GB of RAM will greatly reduce the sluggishness that occurs during page outs and will allow you to work without restarting for much longer. However, cycling through a few hundred previews will quickly consume most of 16GB of RAM and likely much more if available.

CONCLUSIONS AND RECOMMENDATIONS

In my observation, Lightroom will take full advantage of any available RAM on a MacBook Pro. The more previews you load, the more RAM is used. 16GB of RAM allowed Lightroom 4 along with several other programs to run for several days. With 4GB of RAM, Lightroom ran well but did exhibit occasional sluggishness. But on an older system, a Core 2 Duo machine, 8GB of RAM did not overcome the aging processors. Apply these observations to your own experience to determine your purchasing. I recommend at least a quad core Mac, then as much as RAM as you can reasonably purchase. It's my observation that the processors are much more important than RAM.

These are subjective conclusions based on my experience using very limited test machines. I’ve made some conclusions about memory and page outs based on observing Activity Monitor. I did not give a hard answer to the question, “How much RAM does Lightroom need?,” because it depends on your own work habits and what processors are in your Mac. A new Mac with a faster processor can run Lightroom 4 smoother than an older Mac with more memory. Feel free to send me any insightful comments via email.

Lightroom 3 vs Lightroom 4 Benchmarking Previews and Export

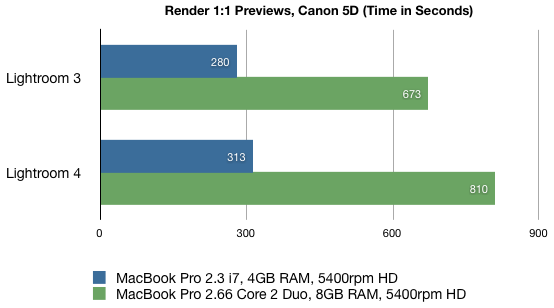
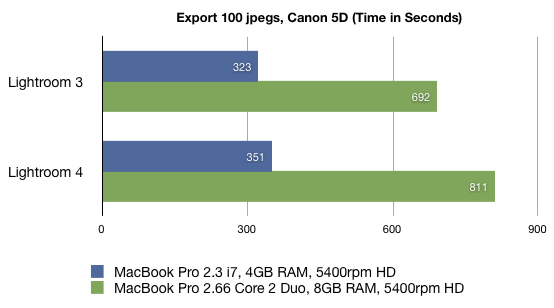
I previously ran benchmark tests comparing Adobe Lightroom 4 performance between a mid 2009 MacBook Pro and a mid 2012 non-retina MacBook Pro. It’s worth going back and seeing the difference in performance between Adobe Lightroom 3 and 4.1. Again, I will benchmark time to render 100 1:1 previews and export 100 jpegs from a Canon 5D. The tests were run on a mid 2012 non-retina unibody MacBook Pro 2.3 core i7 and again on a mid 2009 unibody MacBook Pro 2.66 Core 2 Duo. Benchmark chart lightroom macbook pro

Lightroom Export jpegs Benchmarks chart

In my test, Lightroom 4.1 is slower than Lightroom 3 but less so with the newer processor. On the 2009 MacBook Pro, Lightroom 4 is 15-18% slower than Lightroom 3, but on the new 2012 model Lightroom 4 is only 10% slower in these benchmarks. I’m not sure why this is the case especially considering the new 2012 model has only 4GB of RAM.

These test measure the performance of preview rendering and exports, but what about the general performance of Lightroom 3 vs Lightroom 4? I know that with my 2009 Macbook Pro, the Develop module was rather useless once any brushes or retouching tools were used. The machine would hang to a halt. On the 2012 non-retina MacBook Pro, these tools keep up with my speed of work.

So if you have upgraded to Lightroom 4 and it feels slow, you are correct. Upgrading to a newer hardware will surely help. Going back to Lightroom 3 wasn't an option for me because Canon 5D Mark III files do not process in Lightroom 3.

If your curious to see how your machine compares, please read my previous post on how I set up my benchmarking test.

MacBook Pro Mid 2012 vs 2009 Lightroom 4 Benchmarks

My mid 2009 15" MacBook Pro Core 2 Duo was chugging along just fine and I was not thinking about an upgrade. That quickly changed when I upgraded to Adobe Lightroom 4 to process my Canon 5D Mark III raw files. Suddenly I was getting tons of hangups and rendering previews and exporting files were taking forever. The worst was the develop module of Lightroom 4 which was nearly unusable. Any brush or clone edits would grind my MacBook Pro to a halt. So it was time for a new machine. I was tempted by the Apple's new Retina Macbook Pro but the I couldn’t justify the higher price. At first glance, they are priced $400 over the non-retina counterparts but after outfitting it to my needs with more RAM and a larger flash drive or portable external drive, the price quickly soars. So the next generation MacBook Pro will have to wait until next time when flash drives are larger and more affordable. I wrote about the Retina MacBook Pro previously.

I opted for the base model 15" 2.3ghz because I didn’t think there is a big performance gap between 2.3ghz and 2.6ghz. MacWorld has some good speed comparisons.

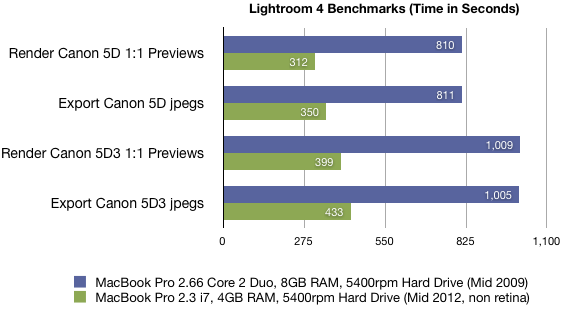
I ran some benchmark test between the two machines, namely 1:1 preview rendering and exporting jpegs. Here’s how I set it up if you want to compare. Reboot the Mac. Make a new clean Lightroom catalog. Import 100 raw files. No develop setting are applied. Select all, then go to Library>;Previews>;Discard 1:1 previews, just in case Lightroom has built any previews. Then, select all, Library>;Render 1:1 Previews. Start timing. At the top you can see the progress bar. Stop timer when text underneath progress bar says Task Completed.

For the exports, select 100 images. Export to internal hard drive. No file renaming. File setting are jpegs at 100 quality, sRGB color space, no image resizing, 300 dpi, no output sharpening. Click export and begin timing. Stop timer when complete. (You’ll hear a pop sound if you have not changed general preferences.) Repeat to check your results. Here are the results for Canon 5D Mark III as well as the original Canon 5D. Version Lightroom 4.1. The older machine is a mid 2009 15" MacBook Pro 2.66ghz Core 2 Duo, 8GB RAM, 5400rpm Hard drive. The newer Mac is a 15" quad-core 2.3ghz i7, 4GB RAM, 5400rpm hard drive.

Benchmark chart Adobe Lightroom 4 MacBook Pro mid 2009 vs mid 2012

A three years difference in models gains about 2.5 times increase in performance. Note that the new machine has only 4GB RAM while the older Mac has 8GB. When I upgrade the RAM in the new Mac, I’ll add those comparisons to see any differences.

One thing this chart does not indicate is how the develop module performs. I said earlier my main gripe of my old machine was dealing with Lightroom 4’s sluggish develop module. I couldn’t figure out a way to benchmark the develop module. I can tell you that I haven’t seen any spinning beach balls and everything is moving along quickly.

One surprise of the data was that previews and exporting times for the larger Mark III files compared to the original 5D files are only 20% slower. I was expecting a bigger difference since the Mark III files are twice the size.

In the near future I will test the speed difference between Lightroom 3 and 4.